Building a Live MJML Email Preview with Node.js
Learn how to set up a live MJML development environment using Node.js, Express, and Livereload. Automatically preview your responsive email templates as you edit them.

Alim Naufal
Oct 23, 2025
Building a Live MJML Email Preview with Node.JS
Designing responsive emails is notoriously painful. Traditional HTML emails often rely on complex table-based layouts and inline styles to ensure capability across clients like Gmail, Outlook, and Apple Mail.
MJML (Mailjet Markup Language) solves this problem by providing a declarative way to write responsive emails that compile into reliable HTML.
In this post, we’ll create a local MJML development environment using:
- livereload
- connect-livereload
- chokidar
- express
- mjml
By the end, you’ll have a local server that auto-refreshes the browser every time you edit your .mjml file — making email design much faster.
🔧 What is MJML?
MJML is a markup language designed specifically for building responsive emails. It handles the heavy lifting of HTML table layouts and inline CSS automatically.
Key features:
- Responsive design by default: Layouts adapt dynamically to screen sizes.
- Semantic abstraction: Use
<mj-section>,<mj-column>, and<mj-text>instead of nested<table>elements. - Cross-client compatibility: The compiled HTML renders consistently across email clients.
- Integration with modern workflows: Works well with Node.js, build tools, and CI/CD pipelines.
How to Build It?
- Add this package to setup your project:
   {
   "name": "email-templates",
   "version": "1.0.0",
   "private": true,
   "type": "module",
   "scripts": {
   "dev": "node server.js",
   "build": "mjml email.mjml -o email.html",
   "format": "prettier --write .",
   "send": "node send-email.js"
   },
   "devDependencies": {
   "@eslint/js": "^9.25.0",
   "chokidar": "^3.5.3",
   "connect-livereload": "^0.6.1",
   "dotenv": "^17.2.3",
   "eslint": "^9.38.0",
   "express": "^4.18.2",
   "globals": "^16.0.0",
   "livereload": "^0.9.3",
   "mjml": "^4.16.0",
   "prettier": "^3.5.3"
   },
   "dependencies": {
   "nodemailer": "^6.9.14"
   }
   }
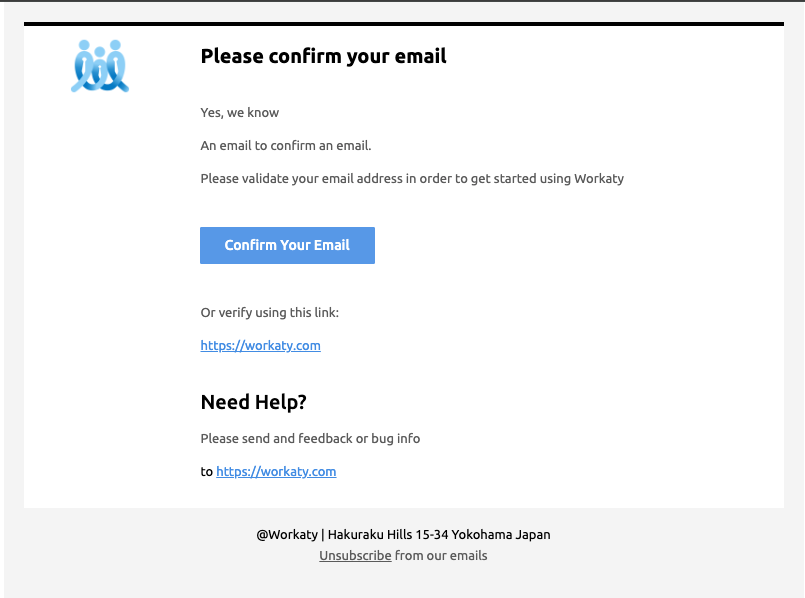
- You can add code on your email template using MJML, for example:
<mjml>
  <mj-head>
    <mj-title>Welcome Email</mj-title>
    <mj-preview>Welcome to our Platform</mj-preview>
  </mj-head>

  <mj-body padding-top="0" width="800px">
    <mj-section padding="20px" background-color="#f4f4f4">
      <mj-section padding-top="0" background-color="#ffffffff">
        <mj-divider padding="0" />
        <mj-spacer height="30px" />

        <mj-column width="21%">
          <mj-image
            align="start"
            src="{{companyImage}}"
            alt="workaty image"
            width="60px"
            height="60px"
          />
        </mj-column>

        <mj-column width="79%">
          <mj-spacer class="responsive-spacer" height="18px" />
          <mj-text font-weight="500" font-size="30px">
            Please confirm your email
          </mj-text>
          <mj-spacer height="20px" />
          <mj-text color="#5b5b5b">Yes, we know</mj-text>
          <mj-text color="#5b5b5b">An email to confirm an email.</mj-text>
          <mj-text color="#5b5b5b">
            Please validate your email address in order to get started using
            {{ product }}
          </mj-text>
          <mj-spacer height="20px" />
          <mj-button
            align="start"
            background-color="#569aec"
            color="white"
            font-size="14px"
            font-weight="500"
            padding="12px 24px"
            border-radius="2px"
            href="{{verifyLink}}"
            target="_blank"
          >
            {{ verifyLinkCaption }}
          </mj-button>
          <mj-spacer height="20px" />
          <mj-text color="#5b5b5b">Or verify using this link:</mj-text>
          <mj-text color="#408ee8">
            <a
              font-size="14px"
              href="{{alternateVerificationLink}}"
              style="color: #408ee8"
            >
              {{ alternateVerificationLink }}
            </a>
          </mj-text>
          <mj-spacer height="20px" />
          <mj-text font-size="20px" font-weight="500">
            Need Help?
          </mj-text>
          <mj-text color="#5b5b5b">
            Please send and feedback or bug info
          </mj-text>
          <mj-text>
            to
            <a font-size="14px" href="{{reportLinkBug}}" style="color: #408ee8">
              {{ reportLinkBug }}
            </a>
          </mj-text>
        </mj-column>
        <mj-spacer height="20px" />
      </mj-section>

      <mj-section>
        <mj-text align="center">
          {{ company }} | {{ companyAddress }}{" "}
        </mj-text>
        <mj-spacer height="8px" />
        <mj-text align="center" color="#5b5b5b">
          <a
            font-size="14px"
            style="color: #5b5b5b"
            href="https://your-link-here.com"
          >
            Unsubscribe
          </a>
          from our emails
        </mj-text>
      </mj-section>
    </mj-section>
  </mj-body>
</mjml>
- Add your server.js This will run a small Express server that converts your MJML to HTML and automatically reloads the browser whenever your template changes.
import { createRequire } from "module";
import express from "express";
import mjml2html from "mjml";
import fs from "fs";
import path from "path";
import connectLivereload from "connect-livereload";
import chokidar from "chokidar";

const require = createRequire(import.meta.url);
const livereload = require("livereload");

const app = express();
const PORT = 3000;
const MJML_PATH = path.resolve("email.mjml");
const OUTPUT_PATH = path.resolve("email.html");

const liveReloadServer = livereload.createServer();
liveReloadServer.watch(OUTPUT_PATH);

app.use(connectLivereload());

app.get("/", (_, res) => {
  let mjml = fs.readFileSync(MJML_PATH, "utf8");

  mjml = mjml.replaceAll("{{product}}", "Workaty");
  mjml = mjml.replaceAll("{{verifyLink}}", "https://workaty.com");
  mjml = mjml.replaceAll("{{verifyLinkCaption}}", "Confirm Your Email");
  mjml = mjml.replaceAll(
    "{{alternateVerificationLink}}",
    "https://workaty.com"
  );
  mjml = mjml.replaceAll("{{reportLinkBug}}", "https://workaty.com");
  mjml = mjml.replaceAll("{{company}}", "@Workaty");
  mjml = mjml.replaceAll(
    "{{companyAddress}}",
    "Hakuraku Hills 15-34 Yokohama Japan"
  );
  mjml = mjml.replaceAll("{{companyImage}}", "/public/asset/workaty_icon.png");

  const { html } = mjml2html(mjml);
  res.send(html);
});

app.use("/public", express.static("public"));

chokidar.watch(MJML_PATH).on("change", () => {
  console.log("MJML file changed. Rebuilding...");
  const mjml = fs.readFileSync(MJML_PATH, "utf8");
  const { html } = mjml2html(mjml);
  fs.writeFileSync(OUTPUT_PATH, html);
  liveReloadServer.refresh("/");
});

app.listen(PORT, () => {
  console.log(`📨 MJML Preview running at http://localhost:${PORT}`);
});
In this case, you can replace all your placeholder, to show your HTML on that port. Once you start the server, open http://localhost:3000. Every time you save email.mjml, the page will refresh automatically with the latest version.
- So you can run on ur locally with:
- pnpm install
- pnpm dev
- If you just want to build HTML, you can do:
- pnpm build
🎉 Wrapping Up
You now have a live MJML development setup that automatically refreshes your browser whenever you edit your templates.
This workflow helps you:
- Preview responsive emails instantly
- Avoid manual rebuilds
- Speed up iteration for complex email layouts
From here, you can extend this setup to:
- Send test emails with nodemailer
- Compile multiple MJML templates
- Deploy your templates to a production build system